Freshly baked loaves of bread have a soothing aroma and a delicious taste that makes you feel at home. Imagine starting your day by having fresh bread paired with coffee for your breakfast. It sure feels good, doesn’t it?
A bread maker machine can handle tons of ingredients to give you different types of bread. Plus, various models feature multiple functionalities that make the bread-making process a straightforward task. Of course, this is to assume that you have enough time to make fresh bread.
While a bread maker might seem restrictive compared to other baking tools, it is quite effective in baking various items, from cakes to homemade bread.
In this post, we will take you through different steps that will give you an insight into how to use a bread maker machine.
Different Parts of a Bread Maker Machine
Cover
As the name hints, this is a movable part that covers the main compartment of the bread maker while it’s preparing, kneading, and baking bread. It can open easily, giving enough space to remove or fix the baking tin’s initial position.
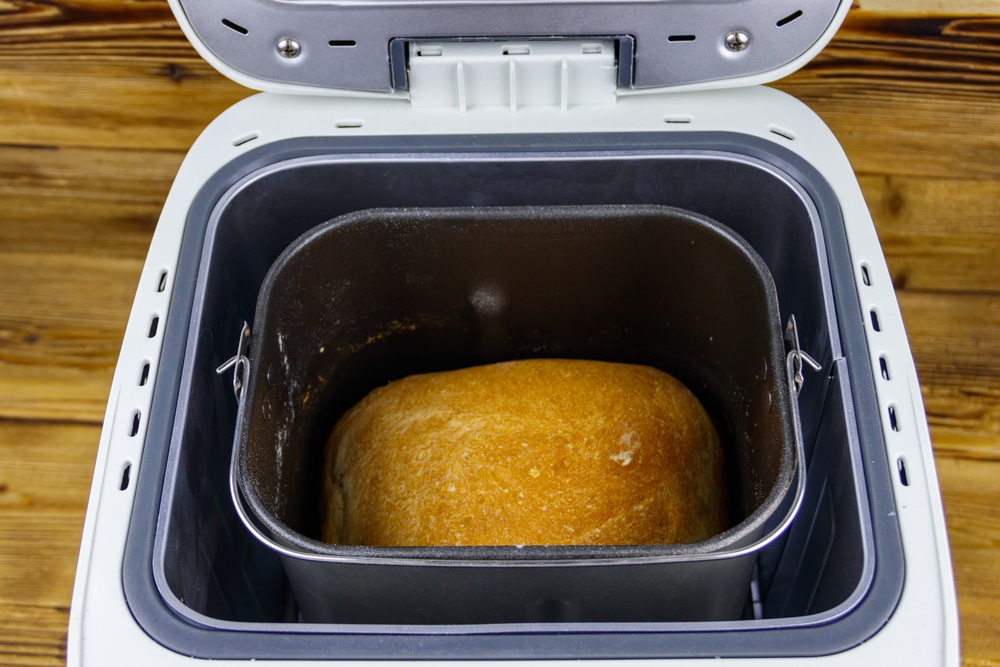
Baking Tin/ Bread Pan
The baking tin, also known as the bread pan, is a container that offers you enough space to put various baking ingredients; it functions as a mixing bowl for both wet ingredients and dry ingredients like dried fruit. Baking tins can be removed from the main compartment of the bread maker once the bread is fully baked. Most baking tins are made from highly conductive materials, making it easier for you to bake loaves of bread in a short period.
Drive Shaft
This part spins at a certain speed and then transfers the mechanical energy to the kneading paddle to mix various ingredients.
Kneading Paddle
As the name hints, this is a long and sleek tool that rotates at a specific speed, mixing different ingredients to give you a high-quality dough.
Step-by-Step Guide on How to Use a Bread Machine
Step 1: Get Familiar With the Different Parts
Start by taking a look at the different parts of the bread machine. You will see a movable lid that opens or closes, making it easier for you to access the main compartment of the bread maker. Once you open the lid completely, you will see a baking pan. A baking pan holds various ingredients while they are being heated at a certain temperature.
Also, some baking pans come with a handle, which makes it easier for you to lift the bread pan from the main compartment of the machine. Moreover, the baking tin comes with a kneading blade that spins at a certain speed, mixing different ingredients to give you a fluffy dough.
A bread maker also features various control buttons for adjusting the baking cycle.
A functional and high-quality bread machine should come with those parts. If one part is faulty, the bread machine might not be effective in kneading and baking a loaf of bread to certain standards.
Step 2: Select the Ideal Ingredients
Start by going through the bread maker’s manual to know how your bread maker works on different instances. Also, the machine’s instructions manual may contain insightful bread machine recipes that can guide you if you are planning to try out new flavours.
While loaves of bread might have a wide array of varying flavours, different types of loaves of bread are baked from the same basic ingredients. Examples of such ingredients include milk, yeast, sugar, salt, water, butter, and flour. There are still more, but these are the most common.
It is also important to note that most bread-making ingredients are available in various types and forms. For example, flour is often produced in different forms, such as plain flour, bread flour, and whole wheat flour.
As the name hints, bread flour is compatible with a lot of bread maker machines and can make it easier for you to bake tons of bread. While other types of flour can produce loaves of bread, they do not produce the same bread quality as bread flour.
Bread flour comes with a lot of gluten. Due to this, it can rise to a certain extent, giving you deliciously fluffy bread.
Moreover, water is a crucial ingredient that is included in various bread recipes. The water that is poured into a bread machine should be at room temperature. However, in some instances, warm water might be needed. If the water is too hot (50-100 degrees), it might affect the yeast less effectively. So, before you add water, make sure you add the right temperature of water for the bread you are trying to make.
Since salt improves the overall flavour of the bread, you can mix it with other bread ingredients. Various types of salts are suitable for baking a tasty loaf of bread. Examples of such salts include table salt, sea salt, and Kosher salt.
Also, salt keeps the dough inside the baking tin by balancing the level the dough rises to.
Furthermore, sugar and honey take the flavour to a whole new level by making the bread sweeter. Such ingredients can improve the texture of a loaf of bread, making it softer than it used to be.
However, too much sugar and too much salt can spoil the flavour of the loaf of bread you are baking.
Yeast is an ingredient which helps you bake high-quality loaves of bread using a bread maker machine. While yeast is available in different types and forms like rapid rise yeast and instant dry yeast, active dry yeast is the most suitable for baking various loaves of bread.
Moreover, bread machine yeast might also be suitable for baking loaves of bread. Alternatively, active fast-rising yeast can also react with other bread ingredients to give you a high-quality and tasty loaf of bread.
If you are unsure about the type of yeast you should be using, you can go through the manufacturer’s instructions guide to get more clarity.
Step 3: Mix the Ingredients in the Right Portions
Once you determine the ingredients, you will use them for baking a loaf of bread. You have to mix all of the ingredients accurately to get superb results.
You can use some measuring tools and equipment to measure the bread ingredients. Examples of such equipment include measuring spoons, digital scales, and a high-quality measuring cup.
Remove the baking pan from the main compartment of the bread maker, then add the baking ingredients into the baking tin following a certain order. The baking ingredients should be put in the baking tin in a specific manner to get superb results.
Start by pouring the liquids into the baking tin; water, oil, and fresh milk. After that, throw the dry baking ingredients into the baking tin, starting with the bread flour. Finish off with salt, yeast, and baking powder.
Once you finish adding the baking ingredients to the baking pan, fix the baking tin into the main compartment. Just place it in its initial position, then push it downwards until it clicks into the main compartment.
Step 4: Adjusting the Settings
To get superb results, you have to adjust the baking settings, depending on the bread machine recipe that you are baking with. Most bread maker machines feature multiple settings, which are compatible with different bread recipes. Not to mention, some settings are indicated based on the type of bread that the bread maker can handle.
Type of Bread
For instance, many bread-making machines come with a white bread baking cycle, a basic cycle, a bagel dough cycle, a raisin baking cycle, a rye bread cycle, a french bread baking cycle, and a timed baking cycle.
If you were planning to bake a white loaf of bread, you must select the white bread baking cycle for the best results.
The settings will differ depending on the type of bread you choose; some bread types will require a longer proving period, while others will need to be cooked at a lower heat or for a longer period. If you select the wrong setting for your bread type, the results could be disastrous.
Check your instruction manual to make sure you have got the setting right before you commit.
Crust Settings
Some bread machines have different crust settings that let you choose different crust colours based on your personal preferences. This functionality can bake the crust to three different levels to give you dark, light, golden brown, and medium-coloured crusts.
Choose the crust setting that suits you the most to get superb results. After that, check if you have adjusted every setting based on the basic bread recipe that you are using. The baking settings have to be adjusted effectively to get good results.
Extras
Some bread makers even have an extra section for additional ingredients, for example, if you want to add dried fruit, olives, or sundried tomatoes. These don’t need to be added until the end of the kneading process, so they must be combined at the correct time so as not to affect the integrity of your dough.
Once you finish checking the baking settings, let the bread maker prepare and bake the dough. Also, please do not open the bread maker once it starts to knead and bake the dough.
Step 5: Take the Loaf of Bread Out of the Bread Maker
Once the bread machine finishes baking, it will notify you. After that, remove the baking tin from the main compartment of the bread maker by lifting it gently using some light force.
A towel might be suitable for holding the hot bread maker’s metallic handle. Oven mitts are also manufactured from materials that protect your hands while you are carrying hot appliances.
Place the baking tin on the kitchen countertop, then give the loaf of bread enough time to cool off. In most instances, this minor step might take around 5 minutes.
Next, take out the loaf of bread from the baking tin by shaking the baking tin gently. Place the fresh bread on a plate, then give it enough time to cool off. A wire rack might also be suitable for this step.
FAQs
Here are some of the most frequently asked questions about these awesome appliances to give you more insights into bread makers.
Which Type of Bread Can the Bread Maker Bake Effectively?
Since white bread is the most popular type of bread, bread machines are quite effective in baking white bread. Not to mention white loaves of bread do not have complicated and confusing recipes. However, most bread makers are also effective in baking other types of bread like sweet bread, french bread, and gluten-free bread.
Which Flour Is the Most Compatible With Bread Machines?
Bread flour is the most suitable flour for bread-making machines. It has high gluten content and has a good rise, giving you a high-quality loaf of bread. While other types of flour can help you bake loaves of bread, they are not as effective as bread flour. For instance, all-purpose flour and whole wheat flour can produce loaves of bread. However, some can’t rise as well. Some flours have more gluten than other flours, meaning they make different textures when creating bread dough.
How Long Does the Bread Machine Take To Prepare, Knead, and Bake Bread?
The total amount of time a bread maker takes to prepare, knead, and bake dough depends on the outcome you want. Various types of bread machines feature different baking cycles that affect the total time that the machine takes to prepare, knead, and bake bread.
Due to this, the total amount of time a bread machine might take to produce a freshly-baked loaf of bread will differ based on the cycle you choose.
Apart from that, bread makers feature a timer that determines when you want to get a freshly baked loaf of bread. The timer adjusts the bread machine in a certain way to bake bread during a predetermined period. Due to this, the total amount of time taken to bake different loaves of bread might vary, depending on the timer settings.
Are Bread Makers Effective in Saving Energy?
Bread makers do not consume a lot of power while baking loaves of bread. Bread-making machines consume little power while preparing and kneading various types of dough. However, if you want to save energy, it may be worth making your bread by hand.
Are Bread-Making Machines User-Friendly?
Well, many bread-making machines have a manufacturer’s user guide that gives you deep insight into different parts of the machine, making it easier for you to operate the whole machine.
Moreover, different baking procedures are completely automated, saving you from the hassle of doing different tasks manually. For instance, the kneading and baking process happens automatically over a certain period of time. The only thing you need to do while baking loaves of bread using a bread machine is to choose a suitable recipe and then mix the recipe’s ingredients to get high-quality bread.
Advantages of a Bread Maker Machine
Using a bread maker machine offers a lot of advantages. Here are some of them:
Freshly Baked Bread
With a breadmaker, you can easily bake various types of bread by following the recipes that have been listed in the manuals. Not to mention, a bread maker prepares, kneads, and bakes dough within a small period, giving you fresh loaves of bread.
Fresh loaves of bread are healthier than the ones that are purchased at stores. Purchased loaves of bread can expire after a short period, exposing you to various vulnerabilities.
Cheaper in the Long Run
While bread makers might have a high purchasing cost, they make it easier for you to save money in the long run. Baking a homemade loaf of bread is cheaper than purchasing various loaves of bread at different stores. All of the individual ingredients do not cost much to buy.
Automated Process
Most breadmakers function automatically, saving you time as you are baking different types of bread. The kneading process is completely automated, saving you from the hassle of doing such work manually.
Apart from that, the baking process is also automated.
Adding wet and dry ingredients to the baking tin is the only task you must perform when using a breadmaker.
Wide Variety of Options
A breadmaker offers you a wide array of settings and functionalities that make it easier to prepare various types of bread. It can prepare white bread, french bread, pizza dough, rye bread, and banana bread. Such machines feature a wide range of cycles compatible with various recipes, making it easier for you to prepare high-quality bread.
Just check your user manual to see what your bread machine is capable of and how to make the most of your appliance.
Bread Machine for High-Quality Bread
And there you have it, everything you need to know on how to use a bread machine. Bread machines are quite effective in making bread that has a good rise, texture, and taste. Not to mention, such machines have various settings for tuning different functionalities based on the bread that you are preparing.
With a bread maker, you can prepare a wide variety of bread, depending on your personal preference.
Additional Resources