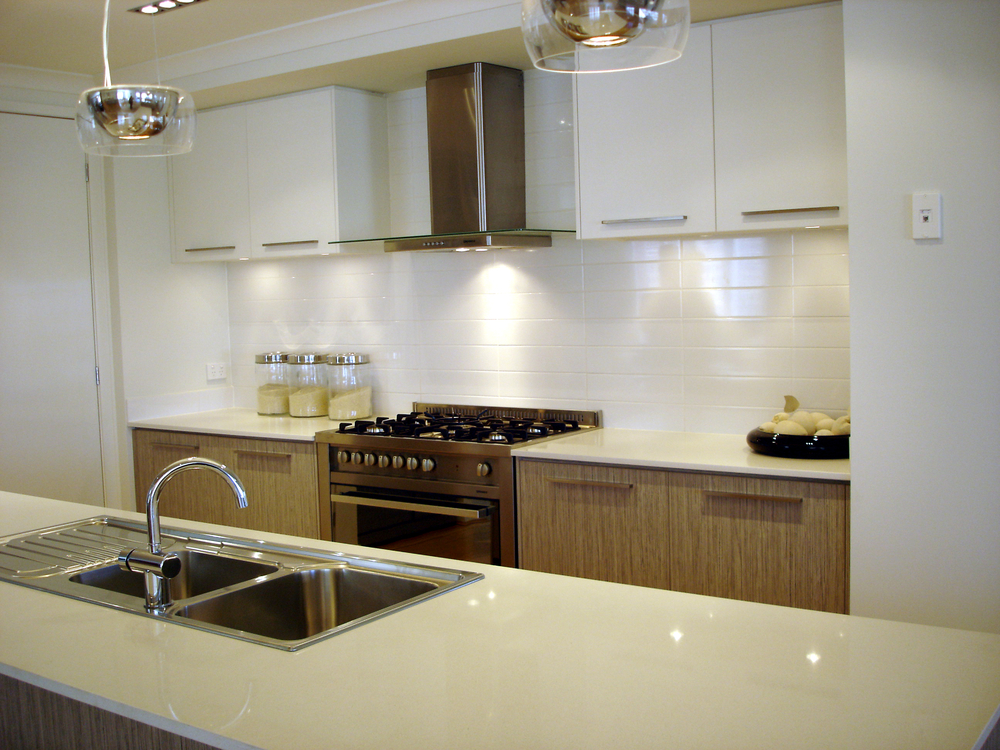
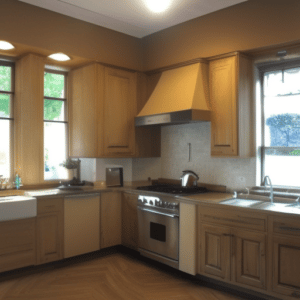
A tiled splashback is one of the best types of kitchen splashback available. This is due to the numerous advantages that tiles provide, as you shall see below. One fantastic feature is that a tiled splashback is extremely easy to install. Tiling projects are some of the most accessible in our homes and a great way to improve your DIY skills. In this guide, we look at how to tile a splashback in a simple 7-step guide.
The Importance of a Kitchen Splashback
It is virtually impossible to avoid creating a mess when cooking using a hob. Boiling food in pans can result in heat stains on the walls. Alternatively, frying food in open pans can result in grease and food debris staining your walls.
This is why tiles for splashbacks in kitchens are invaluable. A splashback keeps your walls clean. Instead of staining the walls, the food debris and steam hit the splashback. Splashbacks are typically made from materials that are easy to clean. Instead of having stained paintwork and plaster, you can wipe clean your splashback using a clean microfibre cloth or damp cloth.
Tile Splashbacks vs Other Materials
When looking at how to tile a kitchen splashback, it is important to understand the benefits of tiles. Firstly, tiling a kitchen splashback is something that anyone can do. In contrast, a stainless steel splashback is not as easy to install and requires special cutting tools like a diamond blade.
Secondly, tiles are generally far less expensive. You can easily find a tile manufacturer that supplies tiles suitable for kitchen splashback and accessories like tile spacers, a tile cutter, and a grout float.
Lastly, tiles are effortless to clean and resistant to high temperatures.
How to Tile a Kitchen Splashback
Tiling kitchen splashback does require a little skill and patience. However, providing that you have minimum DIY experience and a steady hand, you should be able to do it with no problem. Below, we have created a simple how-to guide that anyone can follow.
Things You’ll Need
- Tile adhesive
- Electric or manual cutter for tiles (optional)
- Tile trim
- Ceramic tiles or metro tiles
- Sandpaper
- Cloths
- Masking tape
- Tape measure
- Grout mix
- Tile spacers
- Spirit level
- Grouting sponge
- Silicone sealant
Step 1: Clean and Smoothen the Wall
Before you even consider the tiles and their positioning, you should assess the wall surface. The wall must be as clean and smooth as possible, as this will help attach the tiles. It will also make sure that they sit flush on the wall with no bumps.
Also, if the wall is dirty, it can affect the application of the tile adhesive.
Cover your worktop with plastic sheeting, then assess the wall for any lumps and bumps. If you see any in the plasterwork, use rough sandpaper and sand them. Repeat this process until you are satisfied with the smoothness of the wall.
Once it has been sanded, wipe it with a damp cloth to remove any sanding debris and stains. Lastly, dry it with a clean cloth to remove any excess water.
Step 2: Measure the Area to See How the Tiles Will Fit
Some people now advise that you start applying the adhesive now and fitting the tiles. However, we feel that you should measure the area to do this DIY job properly.
You must have a clear idea of the overall surface area, as this will give you an exact picture of how many tiles are needed. It will also show if you need to cut tiles.
First, measure the entire surface area in width and height using a tape measure to have the overall surface area you will be working with.
You can then lay your tiles out with tile spacers to get the correct number of tiles. Allow for a little tolerance on each side. If the tiles fit perfectly – great, there is no need to trim any.
However, you may find that, in the end, a full tile doesn’t fit. If this is the case, you need to cut the tiles.
First, measure carefully and mark the tile at the point it needs cutting. Next, use a wet tile cutter to score a deep groove in the tile. You should then simply be able to snap the tile cleanly on the groove.
Step 3: Apply Tile Adhesive to the Wall
Tiles are stuck to the wall to create a kitchen splashback using adhesive. There are many different types of adhesive, including cement-based adhesive, tile mastic, and waterproof adhesive.
The adhesive allows the tiles to stick to the wall – this is different from grout mix.
Make sure that you follow the packet instructions for the adhesive – it should explain how to mix it and how to apply it. It is also important to check how long it takes to try and how quickly you need to stick the tiles.
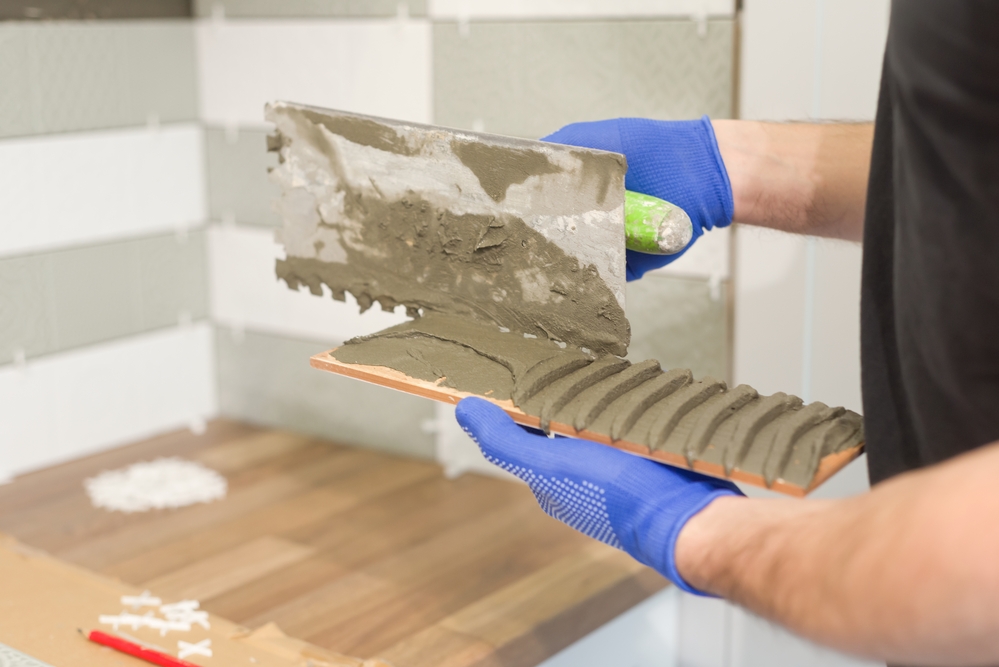
Once mixed, apply a generous layer of tile adhesive using a tile adhesive trowel (or a notched trowel). You should apply this along the bottom of the splashback area. Once you have applied a bottom layer, use the excess adhesive to create vertical lines along the wall. The idea is that you have just enough adhesive on the wall to stick the tiles without having too many spills over the sides.
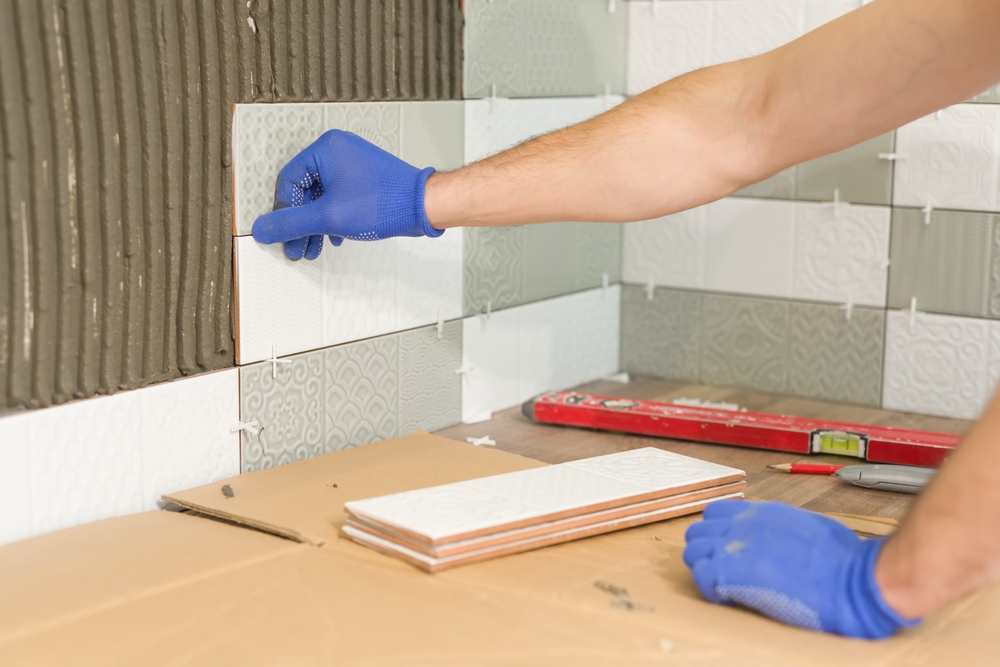
Step 4: Applying the First Row of Tiles Horizontally at the Bottom
After you have cut the tiles with your wet tile cutter and prepared the adhesive mix, it comes the fun part: time to start tiling! Before this, you may want to apply masking tape around the entire splashback area. Using masking tape to mark the edges prevents stains from adhesive or grout on the wall that is meant to be bare.
Lay your tiles on your kitchen top with a tile spacer in-between each one. The spacers make sure that the tiles do not touch and rub against each other. They also make sure that the tiles are aligned properly and look even.
Once you have arranged your tiles, you can apply the first tile to the wall. Start in the bottom left-hand corner. Gently push the first tile onto the wall and apply light pressure so that it lies flush. Working from left to right, repeat this process for the first row of tiles – make sure that you insert a spacer between each tile.
With the first row completed, we advise using a spirit level to check they are aligned properly and even. If you find any deviations, you should have time before the tile adhesive sets to adjust them carefully.
Step 5: Repeat this Process Until the Entire Splashback Area is Covered
Now that you have set the initial row of tiles, you can work upwards and cover the rest of the kitchen splashback area.
It is important to apply tiles spacers horizontally and vertically for subsequent rows. This makes sure that the tiles are even in all directions. Continue to use a spirit level after each row is complete.
Step 6: Apply Grout Between the Tiles
With all your tiles in place, you should have a tiled kitchen splashback that is starting to look complete! However, the last step is to apply the tile grout.
First, wipe any excess adhesive from the surface of the tiles and at their edges, where possible, with a damp plastic scourer. Next, apply the grout generously between each tile. You can use either a plastic grout trowel, a damp grouting sponge, or your fingers to smooth it to create an even finish. Make also sure to remove any excess grout as you proceed, as this will help you with the cleaning process.
Using a damp cloth or damp sponge allows you to smooth the surface and remove any scratches or fingerprints from the grout.
Step 7: Seal the Outline of the Kitchen Splashback
This step is optional and depends on the space between your kitchen splashback and the surrounding walls. If cupboards do not enclose your kitchen splashback tiles, you should ideally seal the edges to finish them off.
This can be done using silicone sealant. Simply use the sealant gun to apply a neat row of sealant around the edges of the external tiles. You can smooth the sealant in a similar manner to smoothing the grout.
How to Tile a Kitchen Splashback FAQs
What Type of Splashback is Best for Kitchens?
A tiled splashback is generally viewed as the best type. This is because tiles are durable, resistant to heat, and easy to clean. They are easier to install than a metal splashback and less expensive.
What Is the Best Colour for a Kitchen Splashback?
This depends entirely on your kitchen design! Many people prefer splashback that blends in with other tilework in their kitchen or contrasts with their kitchen cupboards.
Is Tiling a Kitchen Splashback Difficult?
Yes and no. You do not need to be a DIY expert to tile a splashback. However, patience is required. Also, the right materials and tools are essential. It also helps if you have a steady hand and have worked with things like sealants and grout before.
How to Tile a Kitchen Splashback the Easy Way
Tiling a kitchen splashback is a great way to keep your kitchen clean and prevent excess cooking mess on your walls. As you can see from the above guide, anyone can tile a kitchen splashback!
Providing you have the right gear and follow the steps provided, you should be able to create a fantastic splashback in no time.
Do you have any other tips on how to tile a splashback to share with us? Let us know in the comments!