Have you ever heard of seasoning a ceramic pan? You may or may not have. Either way, you should be aware that seasoning your cookware is quite beneficial! The seasoning process not only creates a protective layer for non-stick qualities but also improves the flavours of the food being cooked.
Well-maintained and seasoned ceramic pans will increase longevity, saving you time and money in the long run. A seasoned ceramic pan helps prevent rust and corrosion, which you want to ward off for as long as possible. Surprisingly, a good pan should last for years, and the upkeep of ceramic pan seasoning can help you.
Please take a look at our helpful guide on how to season a ceramic frying pan. You won’t regret applying this process to your cookware.
What Do You Need to Get Start
There are a few things you need to apply a coating to your ceramic frying pans.
- Cooking oil
- Ceramic pan(s)
- Water
- Dish soap
- Soft sponge
- Clean paper towel or a soft cloth (This item will most likely be discarded or need intense washing afterwards, so use something you don’t mind applying oil.)
Oils
When choosing your oil, you can use a range of cooking oils or oil sprays. We think that vegetable oil works the best, but you can use peanut oil, canola oil, avocado oil, sunflower oil, and grapeseed oil. Any oil with a high smoking point will work.
We recommend avoiding oils with a ‘low smoking point’ such as olive oil, coconut oil, and flavoured cooking oil sprays. These will leave an unwanted odour behind.
Seasoning a Ceramic Frying Pan: A Step-By-Step Guide
For optimal results, you should always season a ceramic pan before using it for the first time, so it might be ideal to buy a brand-new ceramic pan. However, if you already have a ceramic pan that you have already used, that does not matter; you can still apply the seasoning process.
When you buy a ceramic frying pan, it does not have a coating with non-stick properties. Due to this, there’s no other way but to apply it yourself. Also, ceramic pans will lose their coating over time when they are frequently used. So, it would help if you topped up the seasoning on the pan’s surface every couple of months to help create a more permanent layer.
Step 1: Wash Your Ceramic Frying Pan
First, you should wash your ceramic cookware. This is very important since the ceramic pans from the store collect dust and dirt, which will compromise the seasoning process if left uncleaned.
You want to make sure that your pan’s surface is completely clean – this means no burnt food or oil residue. The pan’s surface must be clear because the seasoned coating will cling to the tiniest marks and surface residue. Unfortunately, if these marks are impossible to remove, you might need to buy a new one.
Keep in mind to use soap and water to clean the pan’s surface with a soft cloth. Do not use scratchy material or an abrasive sponge, such as a metal scourer, because this will damage the pan surface. If you have stubborn dirt, you may want to use hot water and baking soda.
Once the pan’s surface is free from residues, please give it a rinse with cold water and let it dry.
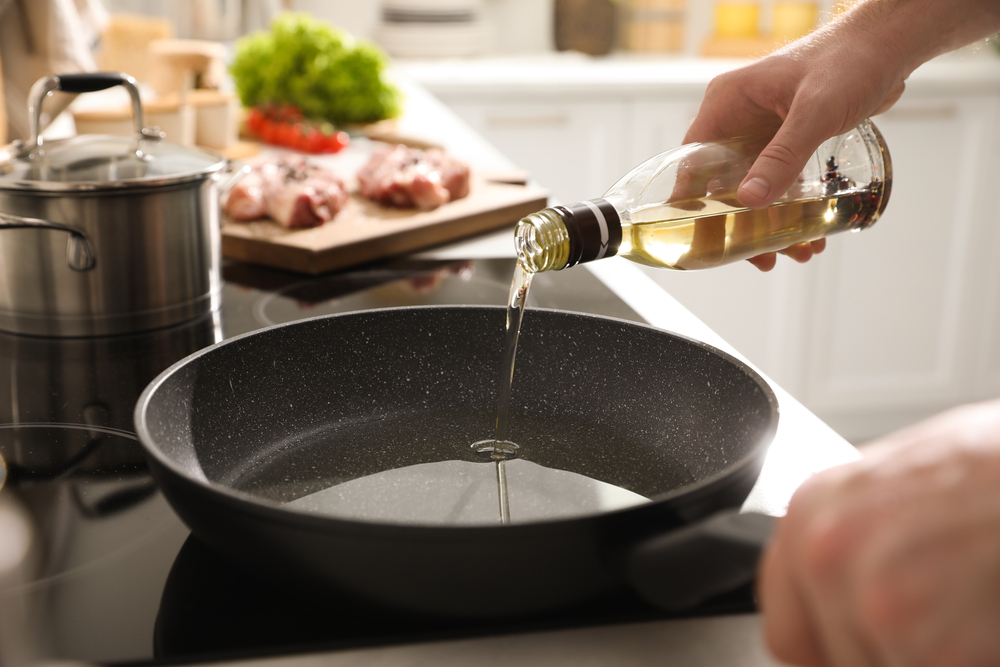
Step 2: Oil It Up
Now, this is the main seasoning of your ceramic frying pan step. Take a tablespoon of your chosen oil (e.g. vegetable oil) and pour it onto the pan’s surface. Spread the oil to the edges of the pan until it is evenly and completely coated. It should be a thin layer, so if you have excess oil, wipe it up, but you can always clear the excess oil later after heating the pan. You do not want the layer to be too thin, either. Feel free to top up the pan with more oil if you feel the pan is not entirely coated.
You can spread the oil with either a clean paper towel or a soft cloth on the entire inner surface. Alternatively, you can use your hands, but this may become messy.
Step 3: Heat It Up
The method splits into two ways: the oven and the stovetop method. Both methods have the same result.
Method 1: The Stove
Put your pan on the hob or stovetop burner, and turn it to medium heat. Don’t be tempted to turn the heat up higher because medium heat will ensure that the pan doesn’t burn too fast and unevenly. Instead, keep turning the pan periodically to make the pan heat and the oil layer even.
The oil heats slowly, so it may take some time before you begin to see smoke. Let the oil heat slowly and patiently. This could take around thirty minutes. Once the smoke appears, remove the pan from the heat immediately and let the pan cool.
Method 2: The Oven
The other option is to use the oven. This will only work if you have a conventional oven. You can use the stovetop method if you have a microwave oven, a toaster oven, or a steamer oven.
If your ceramic pan is oven-safe, you can turn the oven up to 150-160 degrees celsius and put the pan on the middle rack. Remember to check if your ceramic pan is oven-safe before using this method.
Then, take it out of the oven once you see smoke coming from the ceramic surface. You must be very careful, though, because you could burn yourself.
Step 4: The Cooling Process
Now that you have burnt the oil onto the ceramic pan surface, you need to let the pan cool to room temperature.
Don’t try to rush the process by putting it in the fridge, as this can disturb the cooling process. Quick changes from hot to cold temperatures may also cause damage to the ceramic surface.
Step 5: Oil Check
At this point, when the ceramic frying pan is completely cool, you can check the oil on the surface of the ceramic pan.
You can repeat the process if you think you have missed spots with the oil. Just follow the same steps on how to season a ceramic frying pan again, and you’re good.
If there is some leftover oil on the ceramic pan, gently wipe it away with a paper towel. However, you can wait a bit longer for more of the oil to be absorbed.
Keep in mind to be careful not to scrub away the ceramic coating because you may find that the surface of the ceramic pan is oilier, and this is normal. The oil has non-stick properties, so you don’t want to scrub it away with too much paper towel.
Step 6: Use the Pan!
Your newly created non-stick ceramic pan is now ready to use! Enjoy the extra flavouring and non-stick surface; they will be a dream for your cooking adventures.
Here are some top tips that you should consider to ensure that your ceramic frying pan lasts for a long time:
- Don’t use metal utensils – the rough or sharp edges of metal utensils, such as a spatula, can scratch the pan’s surface and disturb the ceramic coatings. This will eventually wear down the non-stick coating.
- Clean the pan properly – clean with soft materials and let the pan soak. If you notice some food still sticking to the pan, don’t be tempted to use a scratchy scourer. Instead, use warm water and baking soda. This way, the non-stick ceramic surface won’t be compromised.
- Remember the oil type – the oil is a crucial step when you season a ceramic pan. If you reapply the process, which you should do every few months, you need to be careful with the ceramic cookware. Remember to use oils with high smoking points, such as vegetable oil, peanut oil, and canola oil, but avoid low-smoking oils, such as coconut oil and olive oil.
- Don’t rush – always use medium heat on your ceramic pans; rushing the heat can disrupt the seasoning process. In the same way, don’t try to rush the cool down, either, as rapid temperature change can damage ceramic frying pans’ interior molecular structure.
- Don’t stack – ceramic cookware should not be stacked, especially with the non-stick coating. This is why you usually see hanging ceramic pans in professional kitchens. Over time, stacking ceramic cookware can chip away at the coating, so you will have to apply it more often.
Cook Away With Your Newly Seasoned Ceramic Frying Pan!
Our guide on how to season a ceramic frying pan is an easy step-by-step guide to help you season your ceramic pans. Your cooking experiences will be much better after following the guide. You’ll be cooking like a chef in no time in your own home!
Remember, any frying pan can benefit from regular seasoning, even aluminium and stainless steel! However, a seasoned ceramic pan is the best choice if you prefer to use cookware that avoids rust and corrosion to a much higher standard.
Let us know in the comments how seasoning a ceramic frying pan has improved your cooking experience.