Although pizza ovens are readily available, easy to use and maintain, and are relatively portable, they still are not common appliances in people’s homes. If you’ve been deliberating whether or not to purchase one, then look no further.
Making your own pizza with a homemade pizza oven from scratch in your back garden is one of our favourite summer activities. And we have all the tips and tricks on how to build a pizza oven so that you’ll be proud to share it with friends.
Let’s Get Started
Make a pizza oven for your back garden with these easy steps.
What You’ll Need
- Cement
- Sand
- Aggregate
- Spade
- Bucket
- Trowel
- Bricks
- Cellophane
- Wooden pallet
- Wood
- Chipboard
- Drill
- Wood saw and wood screws
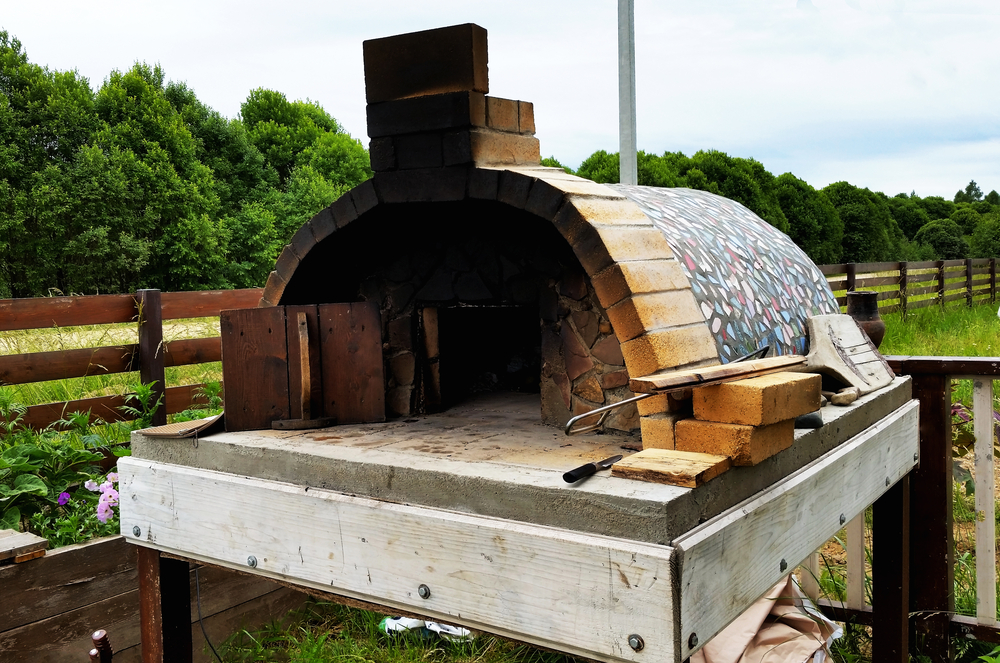
Step 1: Make the Pizza Oven Floor
Begin your homemade pizza oven by constructing the oven floor. To do this, lay down the wooden pallet, making sure that it’s positioned horizontally. You’ll also need the ground to be flat, so you may need to resurface an area if you don’t have a flat surface. This is important for safety when you’re cooking pizza to keep the flames intact. Alternatively, a quick fix to an uneven surface is to add cuttings of wood underneath to raise the wooden pallet.
Once your pallet is on an even, flat surface, take your wood saw to cut out a section of the chipboard to fit inside the pallet. Ensure that there aren’t any gaps between the boards because this will be the oven floor, and it needs to remain sturdy and solid.
Then, mix the concrete using one part cement, two parts of sand and four parts of aggregate (or you can just buy ready-made cement for an easier alternative). Take your spade to apply this concrete mixture on top of the chipboard, ensuring that the location is flat and smooth. The smoothness is important since it’ll be the pizza oven’s floor.
Step 2: Position the Bricks
Now that you have your pizza oven base sorted, it’s time to work on adding the bricks. Begin by taking your bricks and placing them in the desired position on top of the dried cement. It’s best to know your placement before permanently cementing the bricks in place. Plus, this guides you in knowing how many bricks you’ll need.
Step 3: Create an Arch
Once you’re content with where the bricks are positioned, your next step is to create an arch where you’ll access the pizza oven. This arch should be around two-thirds of the oven’s height, and you might want to use some pieces of foam between the bricks for additional support while the bricks dry.
Step 4: Cement All of the Bricks in Place
Once you’re happy with the brick placement (for both the forte and the arch), it’s time to cement them using a mixture of cement and sharp sand (again, you can buy a ready-made mixture if that’s easier for you).
You can make this step a little easier by placing a cellophane sheet onto the base layer and filling it with sand that’s as high as the pizza oven. This will act as support for cementing the bricks in place to prevent them from collapsing as the cement dries. Once you’ve cemented all of the bricks in place, you can then remove this cellophane sheet with the sand.
Layer the bricks from the inside (the first layer that will be touching the cellophane sheet filled with sand).
Additionally, place a bucket at the back of the archway to create a space for the chimney so that smoke can escape while you cook pizza. It’s important to note that the chimney should be higher than the door to allow the smoke to travel away from the front of the oven.
Step 5: Concrete the Outer Layer
At this point, all of the bricks are cemented in place, and you have a bucket still in place to act as the pizza oven’s chimney. Now it’s time to concrete the entire top surface, spreading the concrete across the entire layer to cover and fill all of the bricks. This process not only makes your own wood-fired oven look more appealing but also improves insulation to keep your pizza oven hot for a longer time.
Step 6: Remove the Sand and Cellophane
Now that we’re towards the end of making your pizza oven, it’s time to work on the finishing touches, such as removing the sand and cellophane that was acting as a support system while you cemented the bricks in place. Since you’ll have fixed the bricks in position around and on top of the cellophane sheet, it might be too difficult to simply reach inside and remove them. So you may have to rip open the bag of sand while it’s still inside the pizza oven and then scrape out all of the sand and drag out the ripped bag.
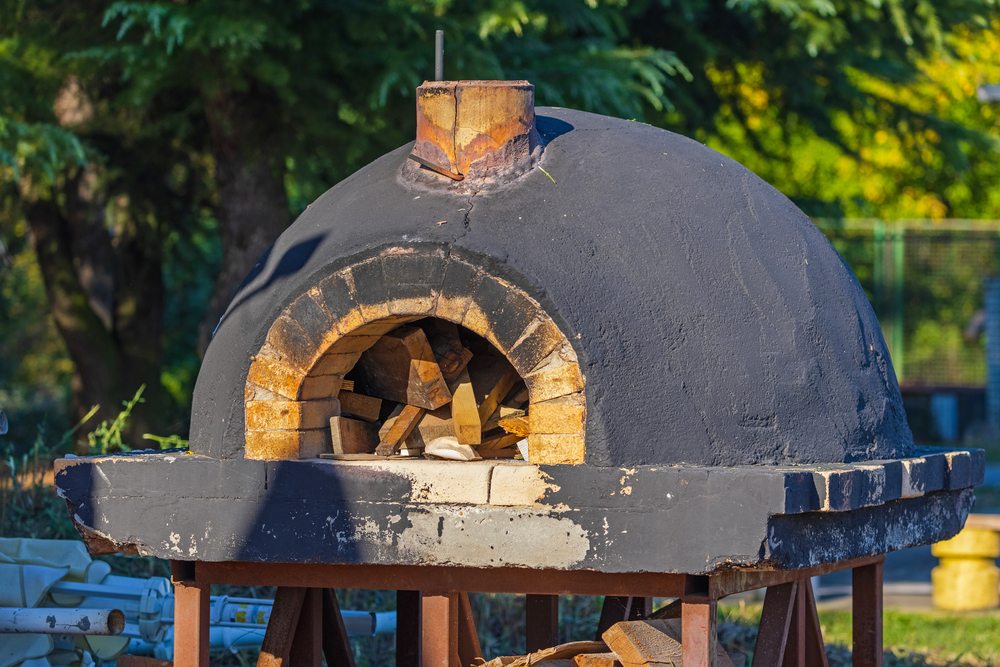
Step 7: Lighting the Wood-Fired Pizza Oven
You’re nearly good to go, but there’s one final step: lighting the pizza oven.
- Add some kindling in the centre of the pizza oven (usually, around four small logs should be enough). Arrange them into the shape of a teepee for the best results, and add some firelighters in the centre.
- Lighting a match, and light the firelighter. Stand back, and the flames should begin.
- Once your fire is burning well, it’s time to gradually add more wood to increase the size of the fire. Don’t add too many logs each time, though. Instead, stick to adding three small-size logs at a time to gradually increase the flame.
- Step back again, and wait until the pizza dome turns a black shade due to the smoke produced.
- Continue to grow the size of the fire by gradually adding more logs. However, ensure that you’re wearing the proper safety equipment (heat-resistant gloves and goggles) to protect your hand and face from the smoking flames.
- Allow the fire’s temperature to increase, and you’ll notice that the dome turns from a black colour to white. Keep monitoring the fire while standing at a safe distance, using probes to move the logs around to evenly distribute the fire.
- After several minutes, check the temperature using a laser thermometer for safety.
- If the fire is too hot (more than 500°C), wait for the fire to cool down slightly and check the temperature again. However, if your new pizza oven is at the perfect temperature, place your pizza on top of a pellet and inside the oven. It should take around one minute to cook if it’s at the right temperature.
Note: Pizza ovens can stay hot for up to two hours, so be careful after you have finished cooking your pizza.
Tips for Making Your Own Pizza
Once you’ve finished the construction, it’s time to get down to business and prepare and cook DIY pizza at home. Below are some tips to help you make delicious pizzas each and every time.
Begin Early
Unlike a traditional gas/electric oven in your kitchen, where you simply press a button or turn a dial to power it on, a wood pizza oven requires more preparation work. In particular, you’ll need to plan burning logs for up to two hours before you plan on using the oven for the temperature to reach the range you want.
Choose Your Wood Wisely
Don’t rush out and buy the first piece of wood you see because not all wood is the same. For example, softwood can release toxic chemicals into the air and even into your pizza. Instead, opt for a simple hardwood for a faster burning time and without the chemicals in the atmosphere or in your food.
Check the Temperature Consistently
The main reason why a dedicated pizza oven produces tastier results for pizza than a home oven is that they reach a high temperature of up to 500°C. But with a wood-fired oven, you’ll need to observe the temperature to ensure that it’s reached a high enough temperature before adding your dough to the oven. Invest in a laser thermometer that accurately measures the fire’s temperature without you having to get too close to the flames and potentially injure yourself.
Place the Pizza Close to the Flame

Placement is everything since you’ll want your pizza to cook thoroughly, evenly and quickly. Therefore, place the pizza dough as close to the flame as you can, but not too close or it’ll burn, and invest in a high-quality, heat-resistant pellet to assist you. You might not get the perfect results that you want from the beginning, so it’ll be trial and error to find the best position for a crispy crust.
Rotate the Pizza While It’s Cooking
Don’t just place the pizza in the pizza oven and neglect it until the time is up. Instead, you’ll need to use a peel to regularly rotate the pizza to brown it on all sides. While a kitchen oven uses air to blow heat evenly on food, a wood-fired pizza oven only has one heat source, so you’ll have to be on guard to prevent your pizza from burning.
The Benefits of a Wood-Fired Pizza Oven
Why buy a wood-fired pizza oven? Well, there are so many reasons.
Healthier Pizza
Wood-fired pizza ovens can actually make pizza healthier by increasing the nutritional value since vegetables and toppings on pizza retain their vitamins and minerals.
Quicker Cooking Time and More Flavourful Pizza
Moreover, these pizza ovens cook food much quicker than a conventional oven because they can reach a higher temperature that can cook pizza evenly in just a couple of minutes. Not only is this beneficial for hungry stomachs, but a faster cooking time also enhances the food’s flavour. This is because the heat evenly distributes through the pizza for a smoky flavour from the wood. You can even alter the taste of your pizza by using different types of wood. And, since the temperature is so high, pizza ovens leave crusts crispy and remove moisture to prevent sogginess. Not to mention that toppings are crispier and more flavourful with every bite.
Cut Energy Costs
Everyone wants to find new ways to cut energy costs. And one way to do that is with outdoor pizza nights. Wood pizza ovens, which use wood as a power source, don’t require gas or electricity for their heat source—just wood. This is beneficial to your electricity bill, not to mention the environment.
Make a Variety of Food
Did you know that a pizza oven has you covered with all types of dishes and not just pizza? So you can cook bread and other ingredients. Decide how you feel when guests come over.
Reducing the Amount of Smoke From the Chimney
Whether you want to be more environmentally friendly or not disturb the neighbours, you might be concerned about the amount of smoke leaving your pizza oven’s chimney. Firstly, ensure that you’re using high-quality wood that’s not wet (so keep it stored in a dry area). You should also avoid burning wood that’s been treated since this type of wood will create more smoke and up to 50 per cent less heat.
Avoid burning other materials such as plastic, charcoal, paint and more, as all of these substances can contribute to more smoke leaving your chimney.
Moreover, ensure that you only load more wood into the pizza oven when the fire isn’t burning as hot. If the fire is clean and hot enough, you shouldn’t have much smoke. In addition, ensure that you use small wooden logs in the oven instead of large pieces and add them gradually. If the logs are too large, they’ll smother the fire and create a lot of smoke.
Maintaining a Wood-Fired Oven
You’ve worked hard to build a pizza oven from scratch, so it’s only right that you’re clued up on maintenance and caring tricks.
The Oven Will Basically Clean Itself
Another great benefit of wood ovens is that the high temperatures kill germs and bacteria, so you needn’t buy a cleaning product. And any food spillages that fall off of the pizza will turn to ash, which you’ll then sweep away.
However, when you notice that there are areas of ash after you’ve cooked your pizza, allow the oven to cool and sweep it out using a metal brush. Best of all, you can use this ash as a natural fertiliser in the garden. Avoid pouring water into the pizza oven to cool it down or remove any debris; doing so could cause permanent damage.
Remove Soot Stains
No one wants soot stains in their oven, but removing them can be difficult. Fortunately, you can prevent soot from getting sticky and oily on patches of your pizza oven’s interior by brushing the area after each use. You’ll need a hard bristle brush to remove stubborn soot, but we don’t recommend using chemical products, as they could potentially leave a stain and even land in your food.
Make a Homemade Pizza Oven
Now that you have the instructions and tips on how to build a pizza oven, are you ready to give it a go? These ovens reach high temperatures, so ensure that you keep children and pets away from the cooking area and wear an insulation layer to protect your face and hands from heat. Do you have any tips on cooking delectable pizza? Let us know in the comments.